Making Audio Reactive TouchDesigner Particle Simulations with Stable Diffusion Img-to-Img Generation
- Melody Geiger

- Apr 18, 2023
- 4 min read
Updated: Jun 12, 2023
Hey all, I wanted to start off by saying that this was for an AI class project with limited time so there are bound to be better ways of optimizing this project. Furthermore, I used 3 different tutorials in order to achieve my intended outcome. Lastly, I do not pretend to be the most literate when it comes to TouchDesigner vocabulary and usage, so keep that in mind if there's something that doesn't make sense throughout this tutorial.


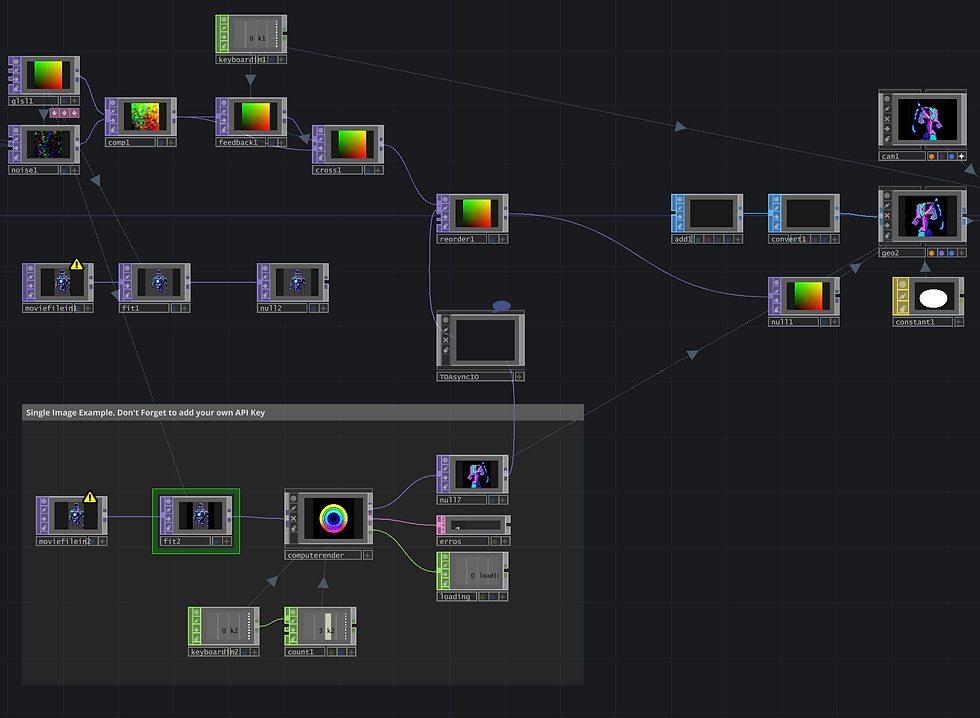
(From Left to Right) 1. Image generated with Stable Diffusion > 2. Image to particle field > 3-4. Audio Reactive Particle Field
First, I will briefly overview the entire process and then I will break it down component by component. I will walk through all steps I took here and include links as necessary. Thanks for stopping by! Let's dive into it.
The first step I took was setting up a system that would take any image and then translate that same image into a particle field. From there I tackled making those particles move based on microphone input coming from my computer. The next step I took was setting up the Stable Diffusion model so that the images from the first step were being generated using AI rather than being uploaded locally from my computer. From this point, I optimized the system to suit my purposes. In my case, I was showing this simulation at an immersive live event, so I set out to make the experience of using my creation as frictionless as possible for a new user.
And that was it! Simple as that. I jest! I jest! To be completely transparent, as a TouchDesigner mostly-beginner, this entire setup took me roughly 12 hours to code and troubleshoot because my inexperience with TD caused me to have to do some research in order to fix some bugs that popped up at various stages. In some cases, I was able to go to friends more experienced than I to get answers, but in other cases, I had to search forums and various tutorials to get answers. That being said, if you have any TouchDesigner experience whatsoever, this setup should go much quicker than it did for me. Anyway enough chit-chat, let's get to the tutorial!
For my purposes, I will not be going over how to install TouchDesigner as I'm sure there are various tutorials on the internet for that. But I will clarify that I was using TD version 2022.32120 for this project.
Step 1
Upon starting a new file, I started off by following this tutorial by Noones Img8 on youtube! https://www.youtube.com/watch?v=hZRZqBKLoUg This tutorial walks us through step 1 which is the image to particle field system. This completes step 1.

Step 2
This begins step 2. Next, I followed https://www.youtube.com/watch?v=1FgJ842dyr4 this tutorial by bileam tschepe (elekktronaut), up until minute 4:37 (I stopped after adding the CHOP Null). This tutorial allowed me to setup the TD file to recognize that I had computer mic input. It's worth mentioning that you could set this up to an external mic using TD components and by changing the audio inputs, but for my purposes, my computer mic would do just fine.

Then, at the next bit I added my own bits of code via the recommendation of Benjamin Randall, a TouchDesigner guru and fellow student, in order to hook up the audio input to the particle field from step 1. At this stage, I could speak into my mic and the images particles would shift and move. Tweaking and experimenting with all of these values was pretty time consuming for me, but it was because I didn't 100% understand what each noise parameter necessarily did. Even after research, the idea was a little hard to grasp, but after fiddling with it for a good while, I achieved a result I was happy with. This completes step 2.

Step 3
This begins step 3. Next, I setup the Stable Diffusion img-to-img generation system by following this tutorial https://www.youtube.com/watch?v=mRXTR9vcHAs&t=0s by Torin Blankensmith until 12:15 so that I could generate images via an independent prompt or img-to-img generation.
Next, I had to hookup the Stable Diffusion image generation to the system from steps 1 and 2. To do this, I actually followed the same steps from the tutorial in step 1 (minutes 2:05 - 2:25) as the same TOP components are being used but now Stable Diffusion is controlling them/acting like a middle man of sorts. This is where I ran into a few bugs to pay close attention and don't make the same mistakes I did! *Make sure to hookup the resolution reference from the Noise component to the Fit component in the Stable Diffusion section (which I copied from the tutorials TD file)* This concludes step 3.

Finally, I had the system working from beginning to end! The last thing I needed to do was optimize for live event usage. I made it so that on a keypress, a new image would be generated in Stable Diffusion, which I found created a nice looking, natural transition effect from the particles.


Comments